Creating custom effects in Alight Motion is one of the most powerful ways to make your videos stand out on platforms like Instagram Reels, TikTok, and YouTube Shorts. Instead of relying on pre-made presets, learning how to build your own effects gives you complete creative control and helps you develop a unique editing style.In this SEO-optimized guide, you’ll learn how to create custom effects in Alight Motion, including key techniques like keyframing, blending modes, velocity, and effects stacking—all explained in a simple, practical way.
What Are Custom Effects in Alight Motion?
Custom effects are manually created animations and visual styles built using tools inside Alight Motion, such as transforms, effects, and keyframes. Unlike downloaded presets or XML files, these effects are designed from scratch, allowing you to fully customize motion, timing, and visual impact.
This is especially useful if you want to create:
- Cinematic video effects
- Smooth transitions
- Glitch and shake effects
- Velocity edits
- Text animations
Step 1: Start a New Project
Open Alight Motion and create a new project by selecting your preferred resolution (1080p is recommended), frame rate (30fps or 60fps), and background color.
Import your video clips or images into the timeline. Organizing your layers properly at this stage will make the editing process much smoother.
Step 2: Understand Keyframes (The Core of Custom Effects)
If you want to master custom effects in Alight Motion, you must understand keyframes. Keyframes control how an object moves or changes over time.
To add a keyframe:
- Select your layer
- Tap on “Move & Transform”
- Tap the diamond icon to add a keyframe
Now, move forward in the timeline and change position, scale, or rotation. Alight Motion will automatically animate between those points.
For example, if you want a zoom-in effect, start with a smaller scale and increase it over time using keyframes.
Step 3: Use Effects Panel Creatively
Alight Motion offers a wide range of built-in effects like blur, color correction, distortion, and more. To create custom effects:
Go to:
Effects → Add Effect
Some popular combinations include:
- Gaussian Blur + Opacity keyframes for smooth transitions
- Directional Blur + Motion Blur for speed effects
- Glow + Exposure/Gamma for cinematic lighting
The key here is layering multiple effects and adjusting their parameters instead of using just one.
Step 4: Master Blending Modes
Blending modes help you combine layers in creative ways. This is essential for effects like light leaks, overlays, and cinematic tones.
To use blending modes:
- Select a layer
- Tap “Blending & Opacity”
- Choose modes like Screen, Overlay, Multiply
For example, adding a light leak video on top of your clip and setting it to “Screen” can instantly create a professional look.
Step 5: Create Smooth Transitions
Custom transitions are what make your edits look high-quality and engaging.
To create a smooth transition:
- Overlap two clips
- Add keyframes to scale, position, or rotation
- Use motion blur for realism
You can also use effects like:
- Radial Blur
- Zoom Blur
- Wave Warp
These help create trendy transitions often seen in viral edits.
Step 6: Apply Velocity (Speed Ramping)
Velocity editing is one of the most searched techniques in Alight Motion.
To create a velocity effect:
- Split your clip into parts
- Adjust speed (slow → fast → slow)
- Add motion blur for smoothness
This technique is widely used in cinematic edits and reels to sync with music beats.
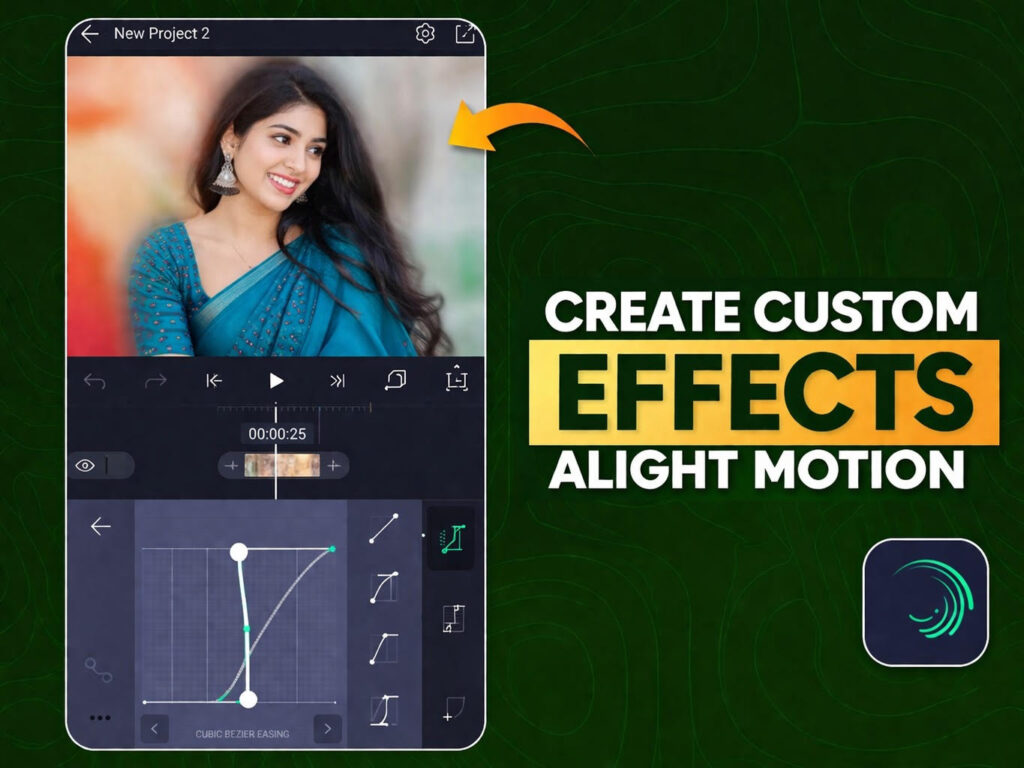
Step 7: Add Graph Easing for Professional Motion
Graph easing controls how animations accelerate and decelerate, making movements look more natural.
To use it:
- Tap on keyframes
- Open the graph editor
- Adjust curves for smooth motion
Ease-in and ease-out curves are commonly used for professional-looking animations.
Step 8: Save Your Custom Effect as a Preset
Once you’ve created an effect you like, you can reuse it.
To save:
- Group your layers
- Export or duplicate the project
- Apply the same structure to new clips
This saves time and helps maintain consistency in your edits.
Best Tips for Creating Custom Effects in Alight Motion
Creating high-quality custom effects takes practice, but a few expert tips can accelerate your progress.
Focus on combining multiple small effects instead of relying on one heavy effect. Subtle adjustments often produce better results than extreme settings. Keep your timeline clean and organized to avoid confusion, especially when working with multiple layers.
Also, always preview your edits frequently. This helps you fine-tune timing and ensures your effects sync well with music or motion.
Common Mistakes to Avoid
Many beginners make the mistake of overusing effects, which can make videos look messy and unprofessional. Avoid adding too many layers without purpose.
Another common issue is ignoring motion blur and easing, which results in stiff animations. Smoothness is what separates amateur edits from professional ones.
I would say, don’t rely only on presets. Learning to create your own effects gives you a long-term advantage.
Final Thoughts
Learning how to create custom effects in Alight Motion is a game-changer for anyone serious about video editing. While presets are useful, building your own effects allows you to develop a unique style, improve your creativity, and produce content that stands out.
With consistent practice and experimentation, you can master advanced techniques like velocity edits, cinematic transitions, and dynamic animations all within Alight Motion.